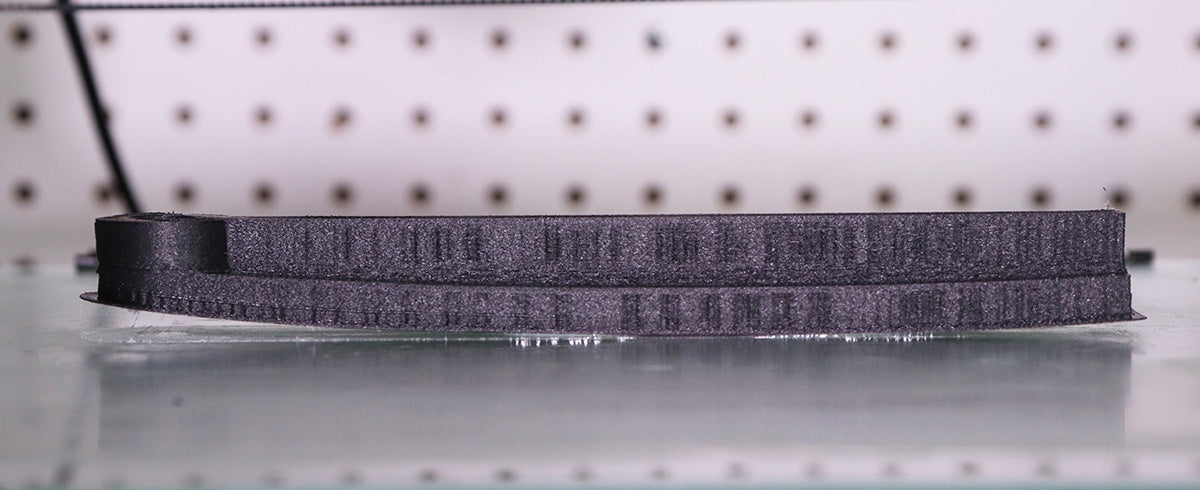
The warping of parts is just about inevitable if you don’t understand the material or machine you are using. Warping is when corners or entire parts of the print curl upward due to uneven cooling, or due to improper bed adhesion.
We can’t suggest enough that everyone checks out the "Material Science" page so that you know why warping is occurring – since it may help you to diagnose and fix the problem without reading this page.
Understand the “Parts Not Sticking to Build Plate” Page
You need to entirely understand this page in order to even start to try and fix your warping problems. A print will have an exponentially higher chance of warping when either part of the print, or the entirety of the print, is too far from the build plate or not properly adhered.
This is fairly easy to understand because the further the nozzle from the buildplate, the less bed adhesion that is involved, the higher chance it will curl up later in the print.
You will need a brim on any material that has a high shrinkage rate and high internal stress rate such as ABS. For large non-circular ABS prints you will need an ABS slurry if you cannot maintain an ambient air temperature of around 45°C.
Understand the material you are using, and possibly use an alternative
You will almost never experience issues with warping when using a material such as PLA, because PLA has a low shrinkage rate and less internal stress (though, to understand this better, refer to the “Material Science” page). Very large, highly dense PLA parts should use a heated build plate and a brim, but it is very uncommon to get warping with PLA on a level build plate.
ABS is an entirely different matter, being an amorphous thermal plastic with a lot of internal stress when extruding. Since ABS also requires a higher temperature for its build plate due to its higher glass transition temperature, the differential between the bed and the ambient air is also increased.
While ABS is great for its price and functionality, this factor may make it impossible for you to achieve certain parts on your machine without warping. This is why it is important to understand the factors and features you are looking for on your print and if you can use an alternative material.
If you require mechanical functionality and affordability, but do not care about acetone vapor finishing or a high glass transition temperature, we used to suggest trying PETG. Now with Polymaker’s new line of PLA, we suggest checking out our Polymax PLA or their PLA Pro. Both of these options have very strong mechanical properties and can replace your need to use ABS, so long as heat resistance isn’t a factor.
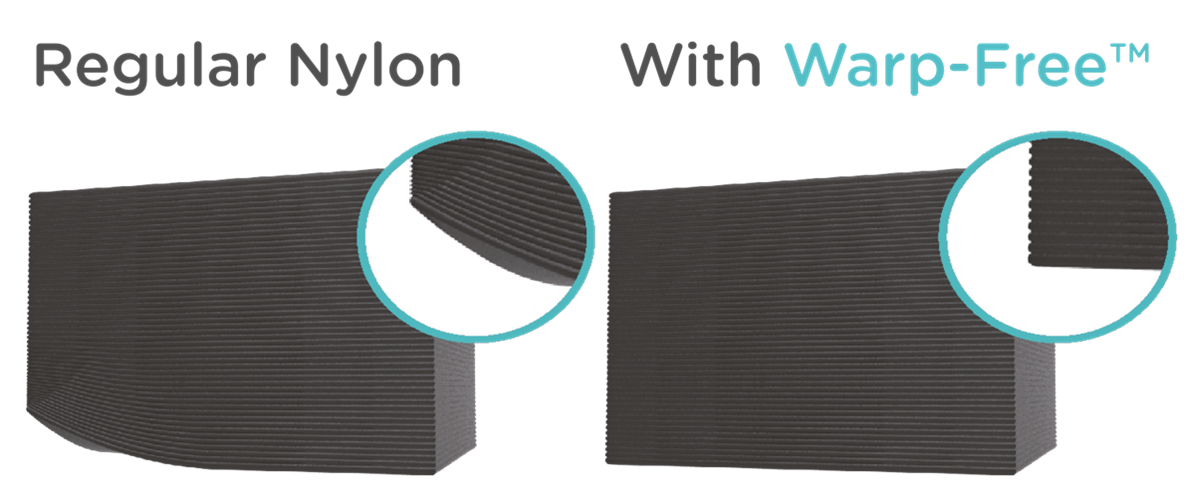
Certain nylon materials that do not have a high glass transition temperature will still have a high probability of warping. This is because they are semi-crystalline with structures that take up less space when they are aligned (room temperature) than when they are chaotic (extruded). Nylon is essentially crystalizing on your printer bed and causing warping. That said, we have implemented our Warp Free technology on the nylons we offer, meaning you should not experience this issue. You can find out more on the "Material Science" page.
For polycarbonate and polycarbonate blends, we prefer to use Magigoo’s PC product for proper bed adhesion.
Print slower and increase printing temperature
This may not work for all materials, but for ABS and ASA you can help to reduce your warping issues by extruding slower and at a higher temperature. As we cover in our “Material Science” page, printing slower gives the material more time to release its stress. This means that a lower extrusion speed will reduce your warping problems.
The same is true with the extrusion temperature. Increasing the extrusion temperature means more motion within the material. More motion + more time to release stress = less warping. Printing ABS as slow as possible on your machine, along with printing temperatures up to around 250-260°C, can help to reduce these internal stresses, and thus, reduce warping.
Printing in an enclosed environment
When you are printing a part on a heated build plate you are automatically working in an environment with uneven ambient temperatures. When the room is around 30°C and your heated build plate is 110°C, there is a quick change in temperature for parts close to the build plate. While internal stresses may be the biggest reason for your warping, this extreme temperature difference will also cause warping problems.
Printing in an enclosed machine allows for the ambient air to remain a bit hotter, due to the trapping of the heat given off by the build plate. This means the ambient air is closer to the glass transition temperature of ABS, allowing for more motion in the material and giving it more time to release stress. We suggest an ambient air of at least 50°C when printing in ABS or ASA.
You can purchase a printer that is enclosed, or somewhat enclosed, which works pretty great if you can afford them. You can also build a DIY enclosure with laser cut acrylic and a few printed parts. Or you can find some other build that someone has posted instructions for online.
When printing a part with a high likelihood of warping in an enclosed machine, you will want to let the bed sit at its printing temperature for around 5-10 minutes to allow the ambient air to heat up. A good ambient temperature for ABS would be 50°C, and ideal up to 65°C. You obviously would not want to print PLA in that type of environment though, since that is right around or above its glass transition temperature.
Many issues can arise when you allow ambient air to rise this high. Stepper motors and other electronics can overheat and cause your printer to malfunction. This is why you will need to have your power supply and board outside the enclosed chamber if possible, have enough heat sinks spread throughout, and keep an active fan on anything that is heating too hot.
Even then you may still experience issues, so be sure to understand some basic thermal dynamics and mechanical engineering before getting your ambient air to 60°C or higher.
Make sure the build plate is not losing heat mid print
If your board is overheating or you having issues with connectivity to your heated build plate, the temperature may drop mid print. If you only watch the beginning of your print and come back when it is finished, you may not even notice this is happening other than returning to a warped part.
Delamination of layers
You may not consider this failure as “warping”, but it has nearly all of the same reasons for happening. This is why it is not included in the “Poor Layer Adhesion” page.

If you have incredible bed adhesion, such as when you use an ABS slurry, but are printing a large part in an open environment - you can experience delamination instead of warping.
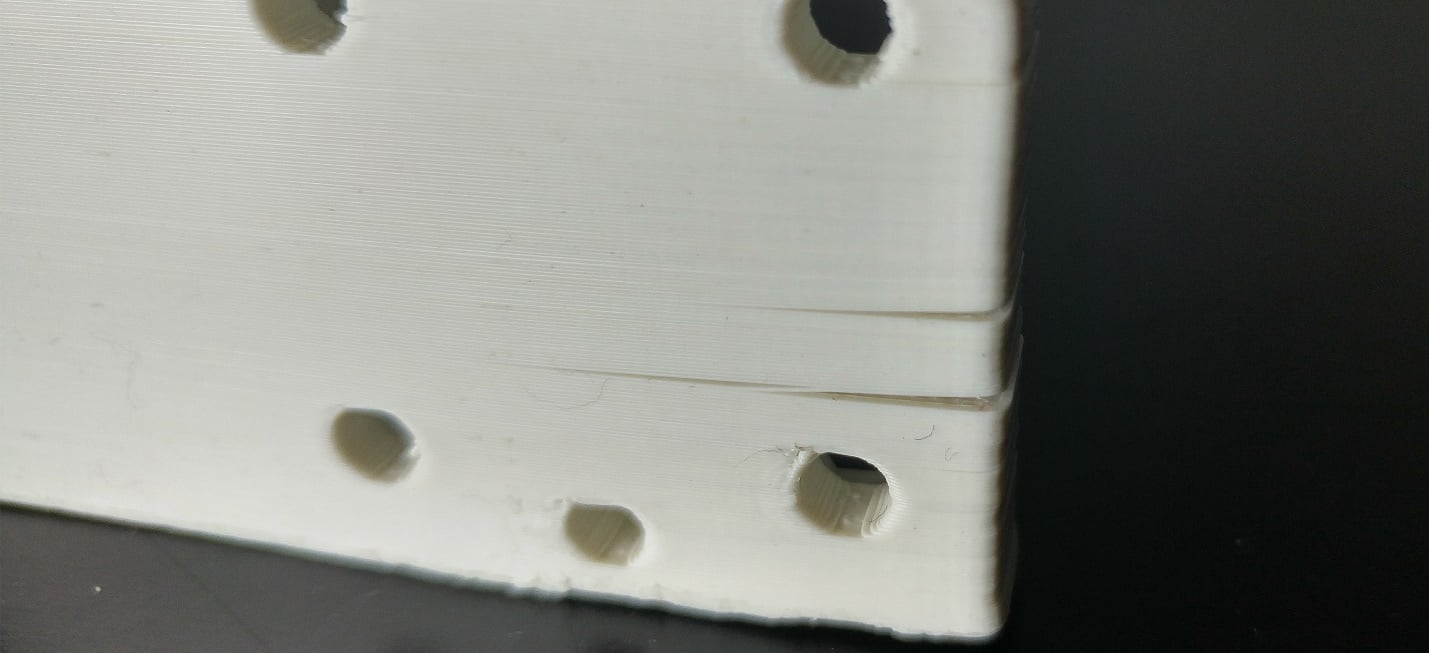
Delamination is when two layer will separate from one another, even when taking in all the layer adhesion precautions. This is because of the same temperature gradients and internal stresses explained earlier, but it occurs when bottom layers are stuck extremely well to the build plate.
The bottom of your print may not curl upward taking the entire print with it, but rather layer adhesion becomes the breaking point for this shrinkage/internal stresses.
If this is happening to you, you will need to check your slicer settings or drastically change your environment/material being used.
We have only experienced delamination on very large PLA prints when the ambient air is quite cold, while it can be unavoidable on tall ABS prints not in an enclosed environment.
Your settings can be tweaked to help prevent this delamination. The denser your part is on the inside, the more likely this will happen, so try printing your part with less infill and a couple more shell walls. Print slower and hotter to also help slow down the material releasing stresses and have more motion. You can increase your nozzle diameter to help increase the amount of entanglements between layers. Most important though is an enclosure keeping the ambient temperature high.
Our Warp-Free™ Technology:

This technology is used by Polymaker in their PolyMide™ family (Nylon based material). We already learned a lot about warping issues and potential root cause earlier in this page. This technology solves one of the root cause of warping issues: Crystalization.
Indeed, Nylon is known as challenging to print because of its warping behavior, because when printing, the quick formation of crystals within each layers will create a lot of internal stress - resulting in part deformation.
Polymaker’s technology is not only reducing this stress, but it is increasing the mechanical properties of the part. The technology slows down the crystallization rate of the polymer, which prevents it from quickly forming small crystals within each layer as they are printed. Instead, it allows the polymer to slowly build big crystal across layers, since multiple layers have time to be printed before the formation of crystals. These crystals across the layers will also significantly increase the inter layer adhesion. This is also the reason why Polymaker will recommend to anneal the part after the printing process. Annealing ensures the part has reached its highest degree of crystallinity, providing the best thermal and mechanical properties.
Summary of Fixes and Precautions
• Read the “Material Sciences” page on this site before reading this page. It will help you to understand why warping is actually occurring.
• Make sure your bed is level and that your Z-height is correct when starting your print.
• Use your preferred method of bed adhesion. I have come to really like the Magigoo line of bed adhesion.
• Print slow and hot to give the material more time to release stress and increase the motion within the material.
• Print with a brim.
• Know the proper print settings for the material you are using.
• Attempt using a material with a lower shrinkage rate and internal stresses with similar applications (Polymax PLA, PLA Pro, PETG, CFR-ABS, PolyMide CoPA, etc).
• Use an enclosed 3D printer, or build an enclosure for your machine, but understand the possibility of parts overheating.
• Make sure the build plate is maintaining its temperature throughout the print.
• Delamination occurs on taller parts that have good bed adhesion. You will need to reduce the density of your part, print an enclosed environment, or use a different material in order to fix this problem.
• Print with a larger diameter nozzle for more layer entanglements.


 United States
 Global
